Connecting Sage 50 US to Quadient AP requires:
- Downloading SmartSync
- Configuring SmartSync
- Connecting SmartSync to Sage 50 US
Downloading SmartSync
Go to Settings | ERP Management. Select the Legal Entity and click Get SyncTool.

This downloads two files to the server - SyncTool.msi and Settings.json. Ensure you are logged into a browser that supports multiple file downloads at once such as Chrome or Firefox.

Open and run SyncTool.msi to install SmartSync.
Configuring SmartSync
Before opening the SmartSync application, the Windows Services must be configured to run using a dedicated Windows user. To do this:
- Open Windows Services.
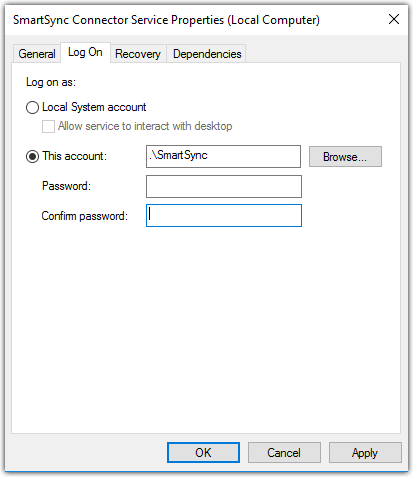
- Right-click on the SmartSync Connector Service and click Properties.
- Select Log On and change Log on as to This Account
- Select the dedicated Windows user.
- Click Apply and follow the steps to restart the service.
Certain sync errors require the SmartSync services to be restarted. To do this:
- Click on Recovery.
- Update the First, Second, and Subsequent Failures to automatically restart the services.
- Click Apply.
- Repeat the steps for SmartSync Polling Service.

Restart both the SmartSync Connector Service and SmartSync Polling Service for the changes to take effect.
Connecting SmartSync to Sage 50 US
Logging into SmartSync Manager
In the Start menu, search for and open SmartSync Manager. Enter the Quadient AP SmartSync User's username and password here. 
Once logged in, select the legal entities and click Import.
Configuring the Integration tab
Select each Legal Entity from the dropdown menu and enter the Sage 50 US company information.

The following fields must be filled in:
- Company: The Sage 50 US company for the legal entity.
- Username / Password: The dedicated administrator user's username and password.
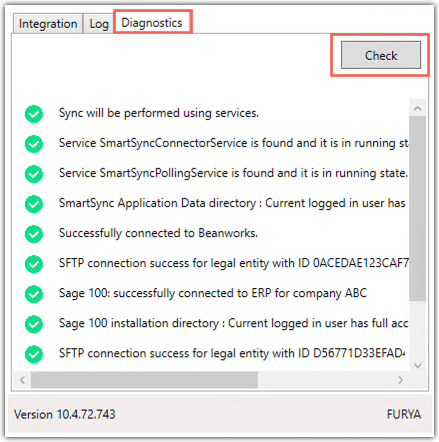
Once all fields are filled in, click save and click Diagnostics. In the Diagnostics tab, click Check to run the diagnostics check to verify the connection is successful.
Syncing Quadient AP and Sage 50 US
When syncing Quadient AP and Sage 50 US for the first time, you must grant third party application access in Sage 50 US. To do this:
- Open Sage 50 US with the administrator credentials.
- Run a full sync in Beanworks and wait for the Third Party Application Access dialog to open in Sage 50 US.
- Select Always allow access.
- Click OK.

The following lists are imported:
- AP Account
Employee
G/L Account
Item
Job
Vendor
\Please review the SmartSync Pre-installation & Connection Checklist Guide before following this guide.
Installing SmartSync requires administrator access to the server environment where Sage 50 US is installed. You may need assistance from your IT provider if you do not have this access. During your initial integration with Beanworks, you are asked to create a Beanworks user specifically for SmartSync. Please have the username and password on hand during this process.
Downloading SmartSync
In Settings, click ERP Management. Select the Legal Entity in question, and click Get SyncTool.

Two files will download - SyncTool.msi and Settings.json. Open and run SyncTool.msi to begin the installation. Please ensure you are logged into a browser that supports multiple file downloads such as Chrome or Firefox.
Configuring SmartSync
After downloading and running SyncTool.msi, you will see the following four processes in Task Manager - SmartSync Manager.exe, SmartSync Connector.exe, SmartSync Polling Service, and SmartSync Connector Service.

If you have not already, please follow the steps here to create a Windows user specifically for running the SmartSync Services. Once this is done, locate the services. Right-click on each one and click Properties.

In Properties, click Log On and change the 'log on as' option to the SmartSync Windows user. You will be prompted to restart the service after doing this. 
Certain SyncTool errors require the SmartSync services to be restarted. Under the Recovery tab of Properties, you can update the First, Second, and Subsequent Failures to automatically restart the services.

From the Start menu, search for and open SmartSync Manager. You will be prompted to enter the SmartSync Beanworks User's username and password here. 
Once logged in, you will select the Legal Entity(s), and click Import.

Connecting SmartSync to Sage 50 US
The Integration tab contains your Sage 50 US information. Each Legal Entity is separated under the Legal Entity tab.

All fields in the Integration tab are needed for the sync to be successful. Here is what they mean in more detail:
- Company: This is the specific company instance in Sage 50 US.
- Username: This is the Sage 50 US Admin username.
- Password: This is the Sage 50 US Admin password.
Some users opt to create a dedicated Admin user for SmartSync. This is not required but is recommended.
Once all necessary information is added under the Integration tab and the Diagnostics check is all green, return to beanworks.ca. Click on the SmartSync tab in Settings to view the SmartSync menu.

Return to beanworks.ca. Click on the SmartSync tab in Settings to view the SmartSync menu.

Select the relevant company from the Legal Entity dropdown menu, and click Sync. For the first sync, you must select Full Sync. All subsequent syncs can be run by selecting Partial Sync.
You must have Sage 50 US open and logged in with the Admin account for the first sync. After the sync is initially requested, you will be prompted to grant SmartSync access to Sage 50 US. Please select 'Always allow access.'

Once the certificate is granted, the sync will finish processing. A green checkmark indicates the sync was successful.
If you receive a sync error you are unsure of, please consult our help centre here or contact our support team at support@beanworks.com
Was this article helpful?
That’s Great!
Thank you for your feedback
Sorry! We couldn't be helpful
Thank you for your feedback
Feedback sent
We appreciate your effort and will try to fix the article