Quadient AP connects to QuickBooks Online via API. Please review the below pre-installation checklist to ensure the connection runs smoothly. This guide is applicable for new integrations with QuickBooks Online, and for adding additional Legal Entities to an existing connection.
Pre-Installation Checklist
Confirm you have a Quadient AP account with the following permissions:
System Administrator role
Root Org Unit access as Home Org Unit.
Confirm you can log into QuickBooks Online account as Administrator
Confirm you can access all QuickBooks companies as Administrator.
Confirm you have ample time to complete the below steps in one sitting. Otherwise, the connection may time out.
Confirm that all other users are logged out to QuickBooks Online at this time.
Confirm the following setting are turned ON in QuickBooks Online to prevent invoices with the same invoice number and vendor from importing.
To do this go to Settings → Account and Settings → Advanced →Other Preferences → “Warn if duplicate bill number is used”.
Quadient AP Connection to QuickBooks Online
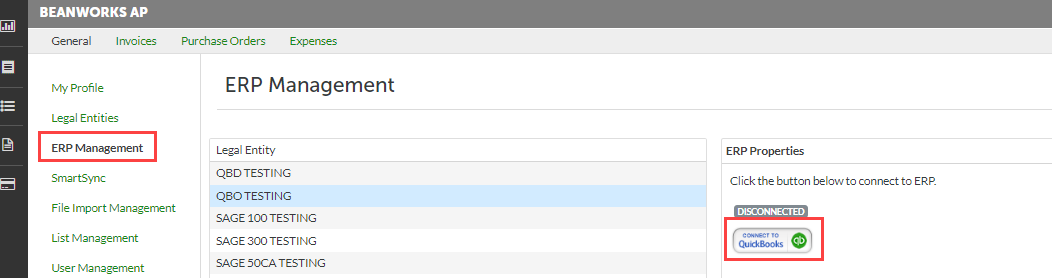
Log into https://www.beanworks.ca/ using the Quadient AP account mentioned in the Pre-Installation Checklist. Navigate to the Settings menu, and select ERP Management. Select the Legal Entity you wish to connect, and under ERP Properties click Connect to QuickBooks.
This will open a separate window where you can log into QuickBooks Online. Please use the Administrator account for this process. After successfully logging in, you will be prompted to choose the QuickBooks Online company that corresponds to the Legal Entity in Quadient AP. Click Next to confirm your choice and complete the connection.

Enabling SmartSync
In Quadient AP, navigate to the SmartSync menu. Select your company from the Legal Entity dropdown, and click Sync. Once
the initial sync is completed, use the Sync Schedule feature to create a schedule of automatic syncs.

Was this article helpful?
That’s Great!
Thank you for your feedback
Sorry! We couldn't be helpful
Thank you for your feedback
Feedback sent
We appreciate your effort and will try to fix the article