Connecting Sage 100 to Quadient AP requires:
- Downloading SmartSync
- Configuring SmartSync
- Connecting SmartSync to Sage 100
Downloading SmartSync
Go to Settings | ERP Management. Select the Legal Entity and click Get SyncTool.

This downloads two files to the server - SyncTool.msi and Settings.json. Ensure you are logged into a browser that supports multiple file downloads at once such as Chrome or Firefox.

Open and run SyncTool.msi to install SmartSync.
Configuring SmartSync
Before opening the SmartSync application, the Windows Services must be configured to run using a dedicated Windows user. To do this:
- Open Windows Services.
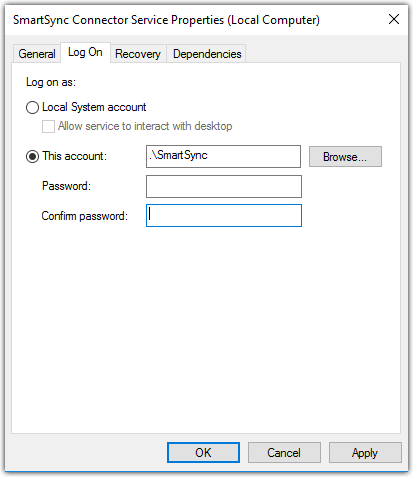
- Right-click on the SmartSync Connector Service and click Properties.
- Select Log On and change Log on as to This Account
- Select the dedicated Windows user.
- Click Apply and follow the steps to restart the service.
Certain sync errors require the SmartSync services to be restarted. To do this:
- Click on Recovery.
- Update the First, Second, and Subsequent Failures to automatically restart the services.
- Click Apply.
- Repeat the steps for SmartSync Polling Service.

Restart both the SmartSync Connector Service and SmartSync Polling Service for the changes to take effect.
Connecting SmartSync to Sage 100
Logging into SmartSync Manager
In the Start menu, search for and open SmartSync Manager. Enter the Quadient AP SmartSync User's username and password here. 
Once logged in, select the legal entities and click Import.
Configuring the Integration tab
Select each Legal Entity from the dropdown menu and enter the Sage 100 company information.

The following fields must be filled in:
- Username: This is the Sage 100 Admin username.
- Password: This is the Sage 100 Admin password.
- Company: This is the Sage 100 Company Code. You can verify this code in Sage 100.
- Installation Directory: This is the filepath to the Home folder for Sage 100.
Some users opt to create a dedicated Admin user for SmartSync. This is not required but is recommended.
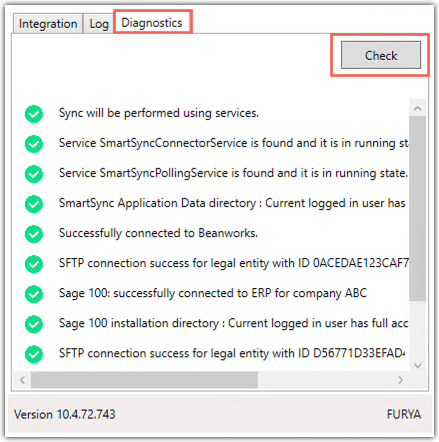
Once all fields are filled in, click save and click Diagnostics. In the Diagnostics tab, click Check to run the diagnostics check to verify the connection is successful.
Syncing Quadient AP and Sage 100
Once all necessary information is added under the Integration tab, return to Quadient AP. Click on the SmartSync tab in Settings to view the SmartSync menu. Run a full sync to import all data from Sage 100 into Accounts Payable by Beanworks. The following lists are imported:
- Division
- Category
- G/L Account
- Item
- Tax
- Separate Cheque
- Unit Measure
- Vendor
- Warehouse
Was this article helpful?
That’s Great!
Thank you for your feedback
Sorry! We couldn't be helpful
Thank you for your feedback
Feedback sent
We appreciate your effort and will try to fix the article